
Jira Service Management
EXPLORING CHANGE MANAGEMENT WITH JIRA SERVICE MANAGEMENT
Jan 04, 2021
In a previous blog post, we outlined some of the amazing additions coming to the new Jira Service Management. In this post, we'll dive deep into JSM's upgraded Change Management module. Enjoy!
One of the most significant advances in Atlassian’s newly released Jira Service Management product is the enhancement of their dedicated Change Management module.
To understand all of the functionality it has to offer, I spent some quality (and quantity) time digging into the details. Below, I’ll share some of the highlights—and potential pitfalls—you may encounter too as you set up this module for the first time.
This blog post only applies to classic Jira Service Desk (now Jira Service Management) projects. Next-gen Jira Service Desk is still in early access mode.
With all the added functionality, the Change Management module in Jira Service Management now enables users to do the following:
Deployment Tracking - Automatically generate Change Requests in Jira Service Management when a deployment is run using Bitbucket Pipelines, Jenkins, CircleCI, or Octopus Deploy.
Deployment Gating - Prevent deployments until Change Requests are approved (Must be using Bitbucket pipelines standard/premium license or Jenkins).
Change Automations - Automatically action Change Requests based on the status of the deployment and the tier of the Service is deployed.
With a change management process fully set up and integrated with the proper CI/CD tool, the change management workflow can look similar to this:
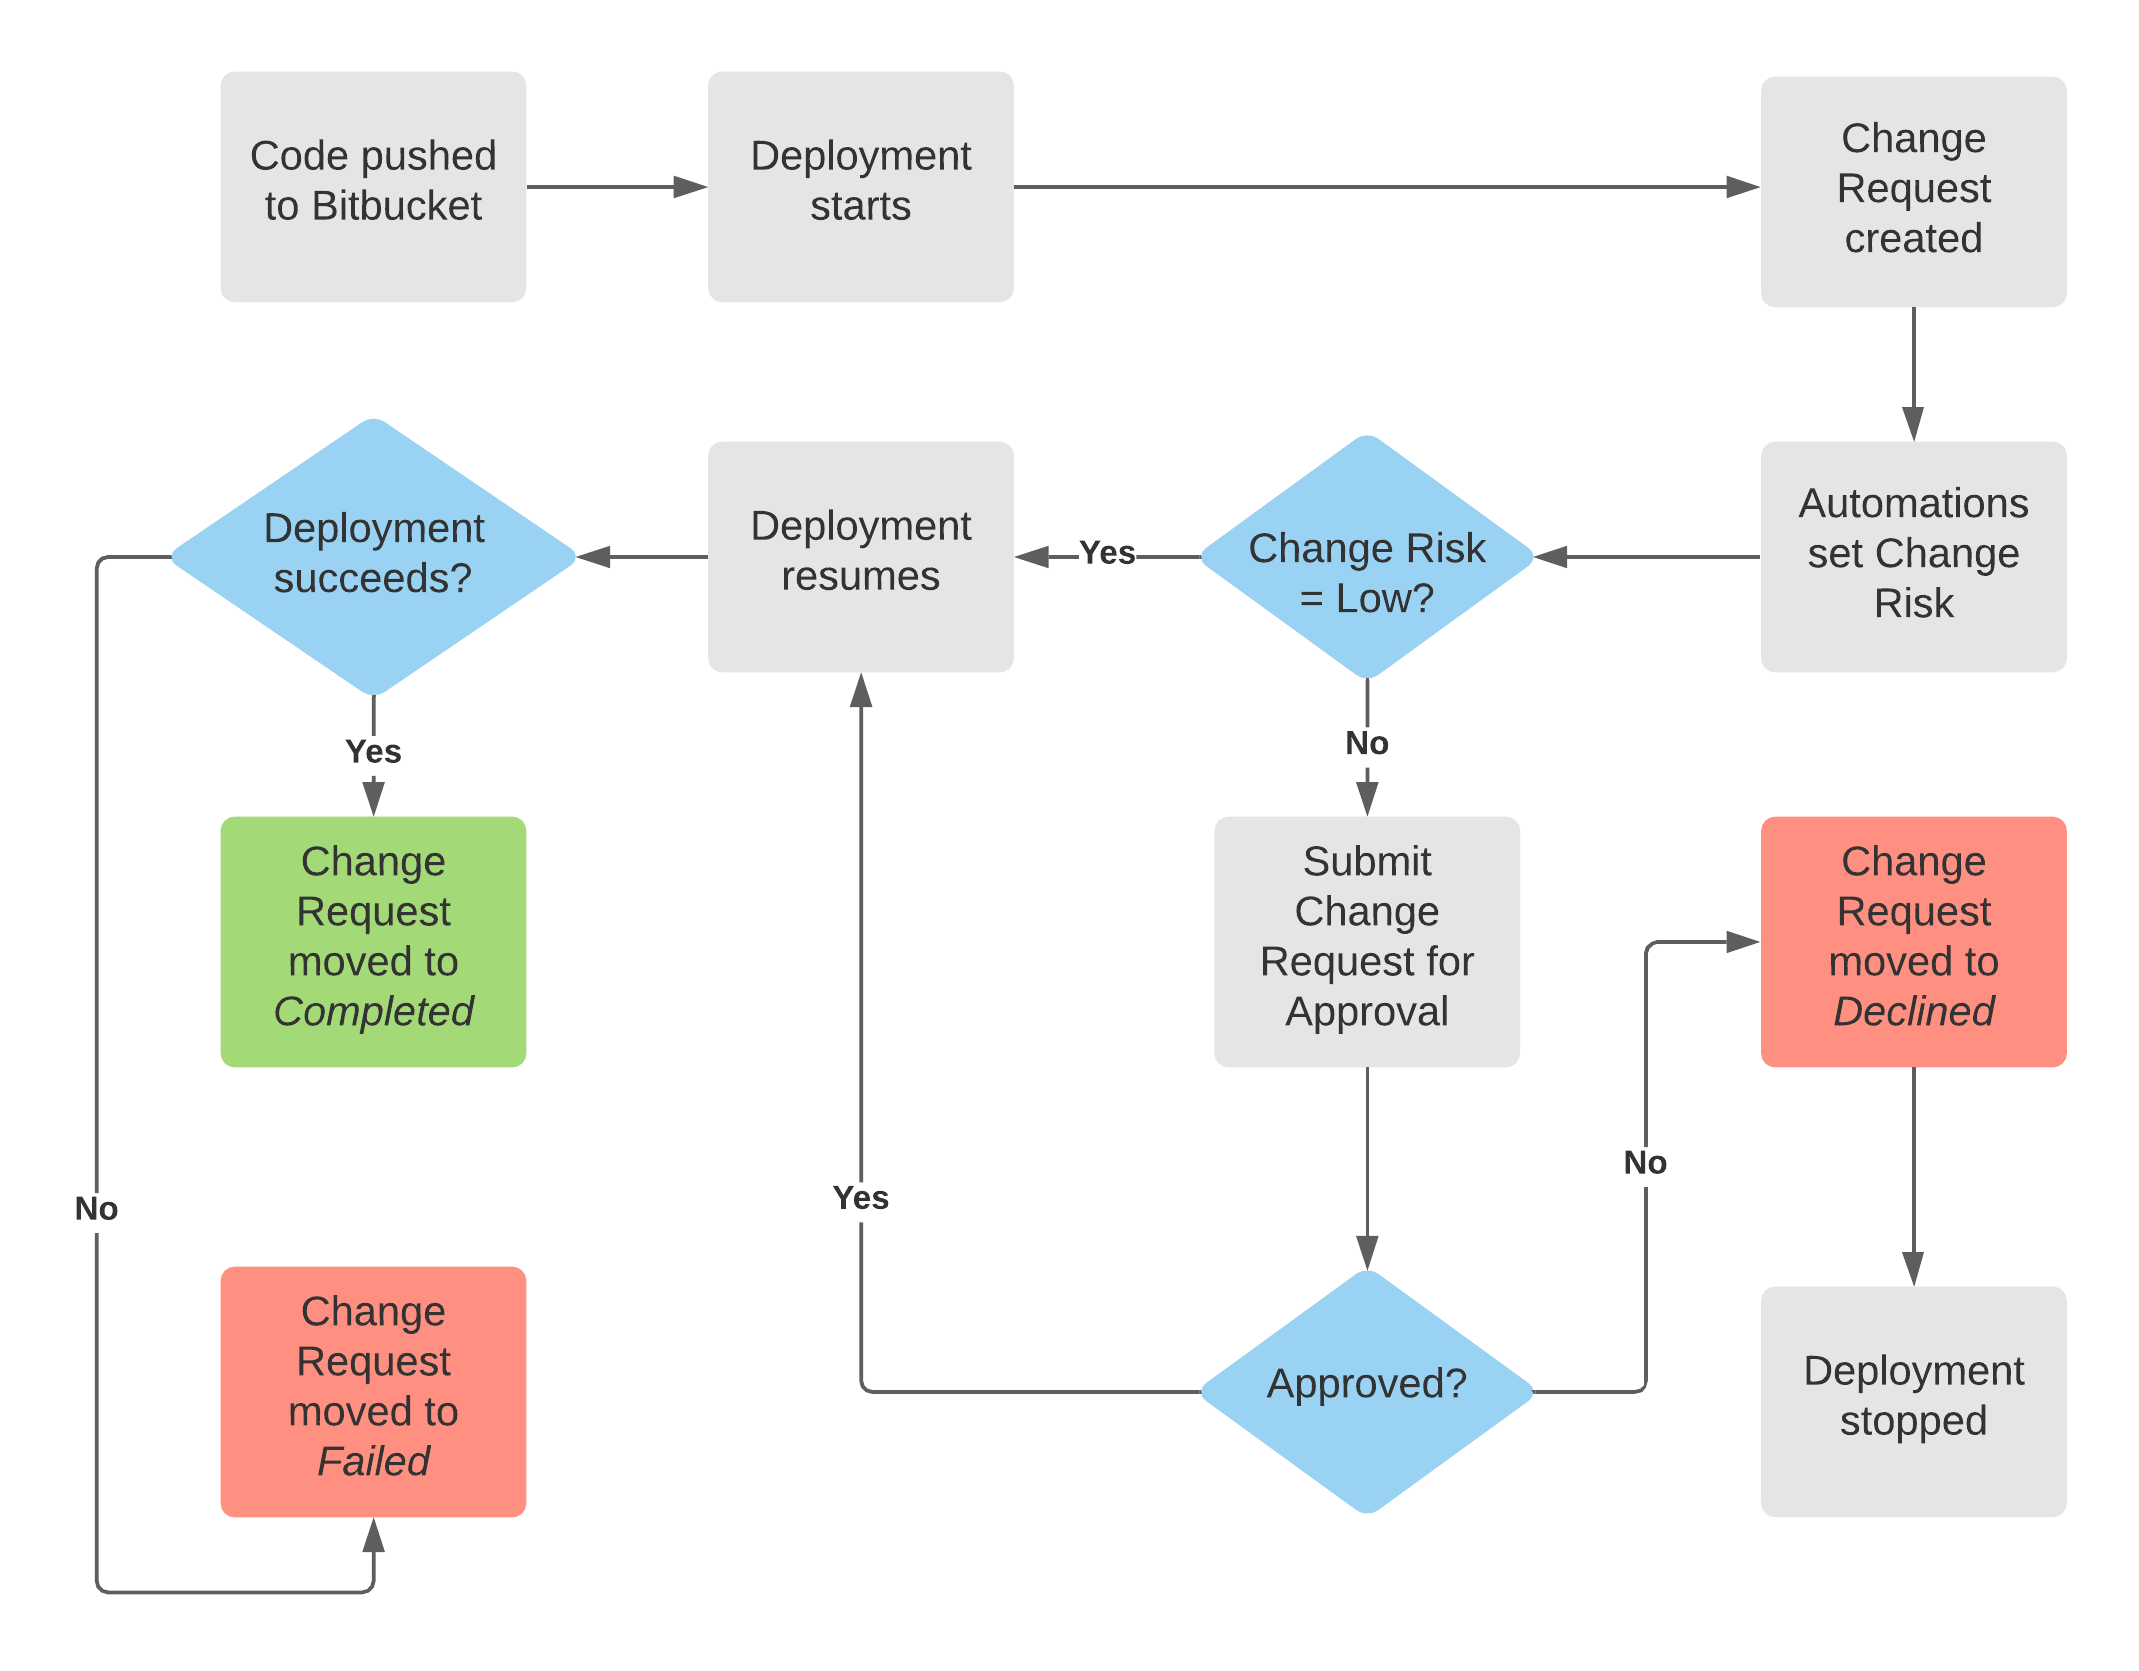
In this document, I’ll show how the change management process above can be set up from start to finish.
Create your project
To utilize the features outlined in this blog post, you’ll need to have a Jira Service Management project. As of the writing of this blog (1/04/2021), the only way to get the Jira Service Management functionality outlined here is to create a new project with the IT service management template.
Setting up Services
Jira Service Management introduces a new concept called Services. Services are the systems, tools, or products which your IT teams are responsible for supporting. Services are connected to OpsGenie for incident escalations (not covered in this blog post) and may be connected to git repositories to facilitate change management requests.
Download the files below and create two new Bitbucket repositories. These repositories define a basic HTML file and Bitbucket Pipelines configuration. This will allow you to test the deployment functionality without actually “deploying” anything real.
In this example, I’ll be creating two Services and connecting them to two existing Bitbucket repositories. If you want to follow along with this blog post, download the two zip files attached webstore.zip and webstore1.zip.
After downloading the files, you’ll need to turn them into git repositories and push them to Bitbucket. I created two repositories called Webstore and Webstore1. For instructions on creating a git repo, check out this documentation.
To create a Service, navigate to the project you created and select Services > Add a service. Fill out the information as detailed below.
Field | Value |
|---|---|
Name | Webstore |
Tier | Tier 1 |
Incident responders | Webstore Team (You may need to create a new team) |
Change approvers | site-admins (or create a new group) |
Repository | Webstore (Your DVCS account must be connected) |
Create your second Service
Field | Value |
|---|---|
Name | Webstore1 |
Tier | Tier 3 |
Incident responders | Webstore Team |
Change approvers | site-admins (or create a new group) |
Repository | Webstore1 (Your DVCS account must be connected) |
Now that we have our Services created and connected to our Bitbucket repositories, we can proceed to the next step.
Configure Deployment Management in Jira
To proceed to the next step, we’ll want to configure the Deployment Tracking and Deployment Deployment Gating in your Jira Service Management project (requires a premium subscription).
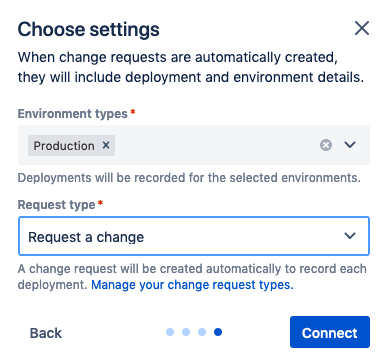
Click on Project Settings > Change Management > Connect pipeline > Use an existing service. Select the Webstore Sevice and fill out the Environment types and Request type fields, then press Connect.
Underneath Deployment gating, select the radio button to allow/prevent deployment depending on the status.
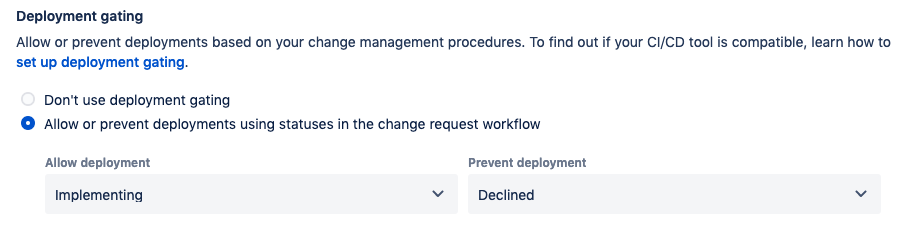
By turning on deployment gating, we are telling the system at what point in the workflow we should allow a deployment, and at what point in the workflow we prevent a deployment from occurring. Set the values as follows:
Allow deployment → Implementing
Prevent deployment → Declined
This will stop all deployments to production until the linked change request goes into the Implementing status and fail any deployment where the linked change request goes into the Declined status.
When I began testing the deployment gating functionality, I couldn’t figure out how to enable the Save changes button. To fix this, I had to go back up to the Environment types field and remove Production and then add Production back in. This should enable the Save changes button. Click Save changes.
Once the Deployment Tracking and Deployment gating has been set up, connect your two Services, Webstore and Webstore1.
When finished, your Bitbucket pipelines section should look like this:

Configure the Bitbucket Repositories
Because deployment gating involves both Jira and Bitbucket (or Jenkins), we need to configure the Bitbucket repositories to use deployment gating also (requires Bitbucket standard/premium).
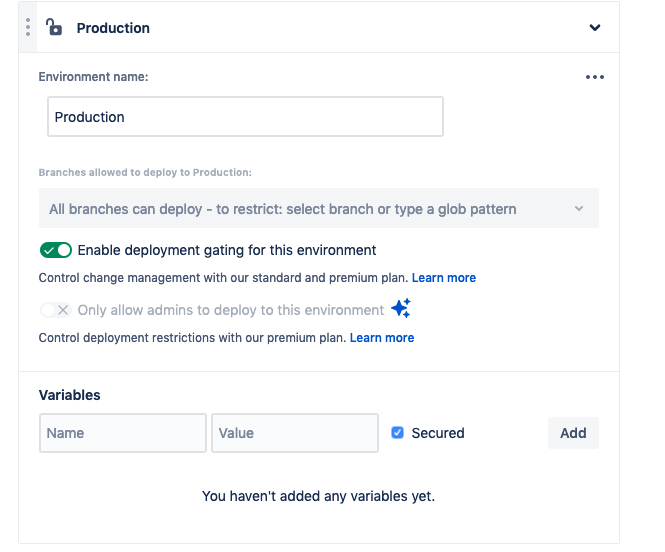
Click on the Configure link for each connected Service. This will bring you to Bitbucket. Expand the Production environment and enable deployment gating for this repository.
Set up your Automations
In this step, we’ll be setting up the automation rules which will keep our change requests up to date.
Navigate back to the Jira Service Management project and click on Project settings > Automation > Automation. You should see three automation rules set up for your project.
If you do not see those three rules, add them from the Library.
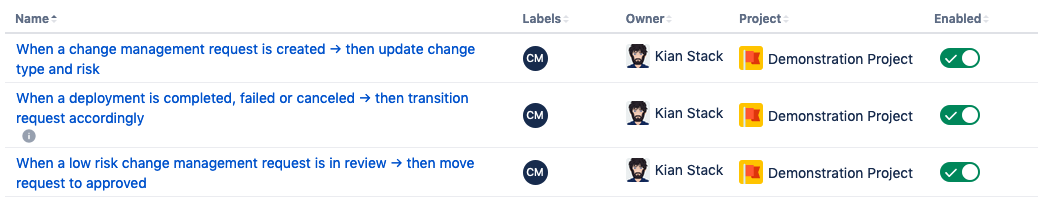
After the three rules are in place, click on each rule, and take a look at what they do:
Rule | Details |
|---|---|
When a change management request is created → then update change type and risk | Sets the Change Risk for all new tickets. If Service tier = Tier 1 → Change Risk = High Else → Change Risk = Low If Deployment Tracking is turned on, but not Change Gating → Transition change to Implementing Else if Change Gating is turned on → Transition Ticket to Authorize |
When a deployment is completed, failed or canceled → then transition request accordingly | If Deployment state = successful → Transition to Completed else if Deployment state = failed → Transition to Failed else if Deployment state = cancelled → Transition to Canceled else if Deployment status = In progress → Transition to Implementing |
When a low risk change management request is in review → then move request to approved | If Change Risk = Low → Change Type = Standard AND Auto Approve request |
These three rules will automatically keep your tickets up to date with the current state of the deployments, and prevent the need for frequent manual ticket updates.
Implement Improvements
While testing automation functionality in preparation for this blog post, I discovered a couple of issues with the pre-built automation rules and the change management workflow which result in undesired behavior. Below I outline the problems I ran into and the recommended solutions.
Problem: When a deployment is declined by an approver, the ticket automatically transitions into the Declined status. This will cause the deployment to fail. When the deployment fails, the automation rule tries to transition the change request to the Failed status, which it cannot do. The owner of the automation rule will get an email indicating that the rule has failed.
Solution: Update the automation rule to stop any attempt to move into the Failed status if the change request is currently in the Declined status.
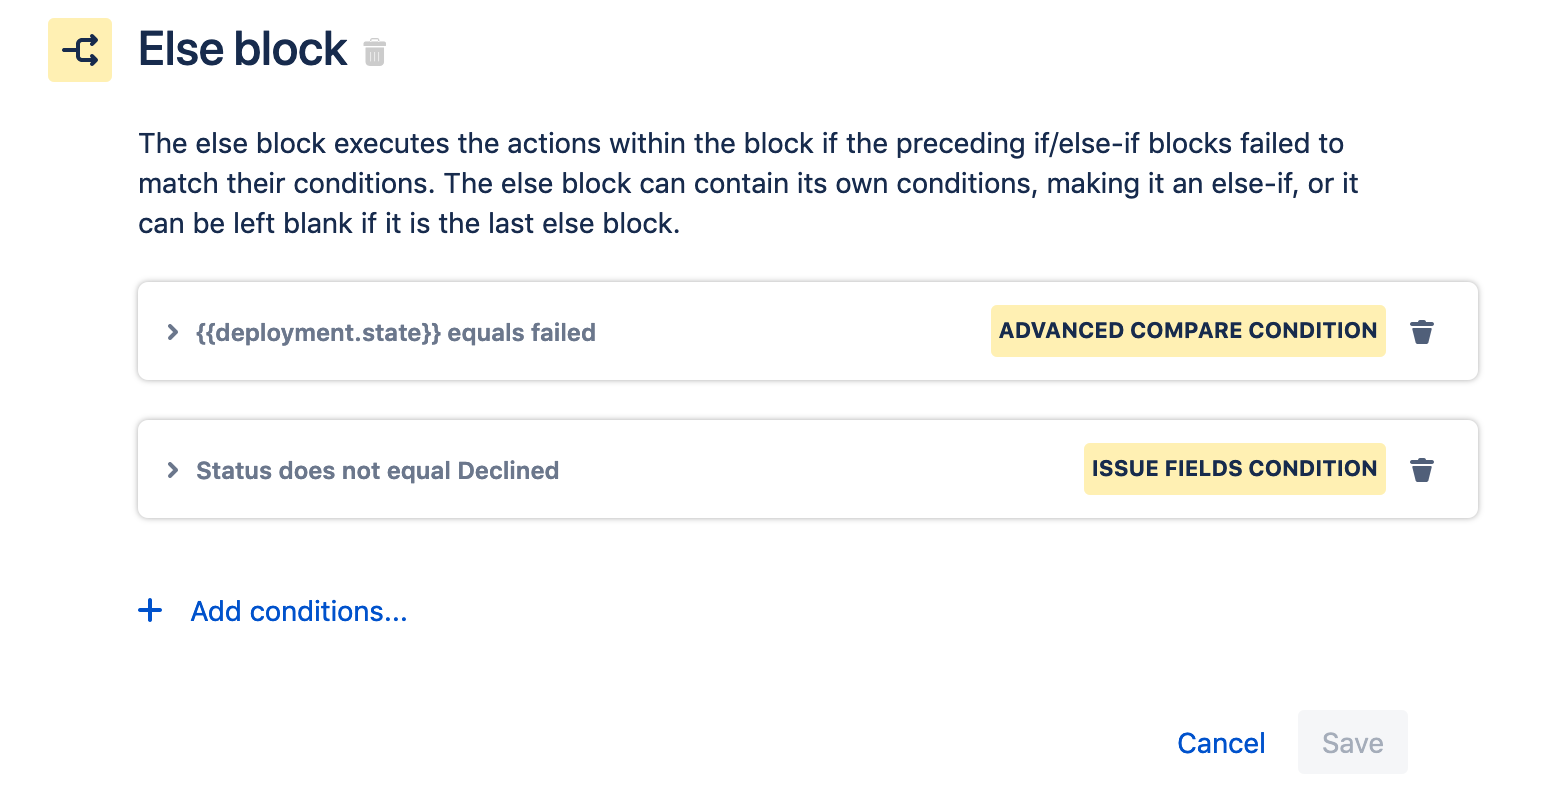
Edit the automation rule When a deployment is completed, failed or canceled → then transition request accordingly
Edit the Else-if block {{deployment.state}} equals failed
Add an additional Issue Fields condition - Status does not equal Declined
The final result should look like this:
Be sure to publish your changes
Problem: When you move a ticket from Awaiting Implementation → Implementing the deployment is automatically restarted. This will cause the automation rule When a deployment is completed, failed or canceled → then transition request accordingly to run again. Because the status of the deployment is “In Progress” it’ll match the final condition of the rule and try to transition to change request to Implementing. Because the ticket is already in the Implementing status, the rule will fail.
Solution: Update the automation rule to prevent a transition to Implementing from being executed if the change request is already in the Implementing status.
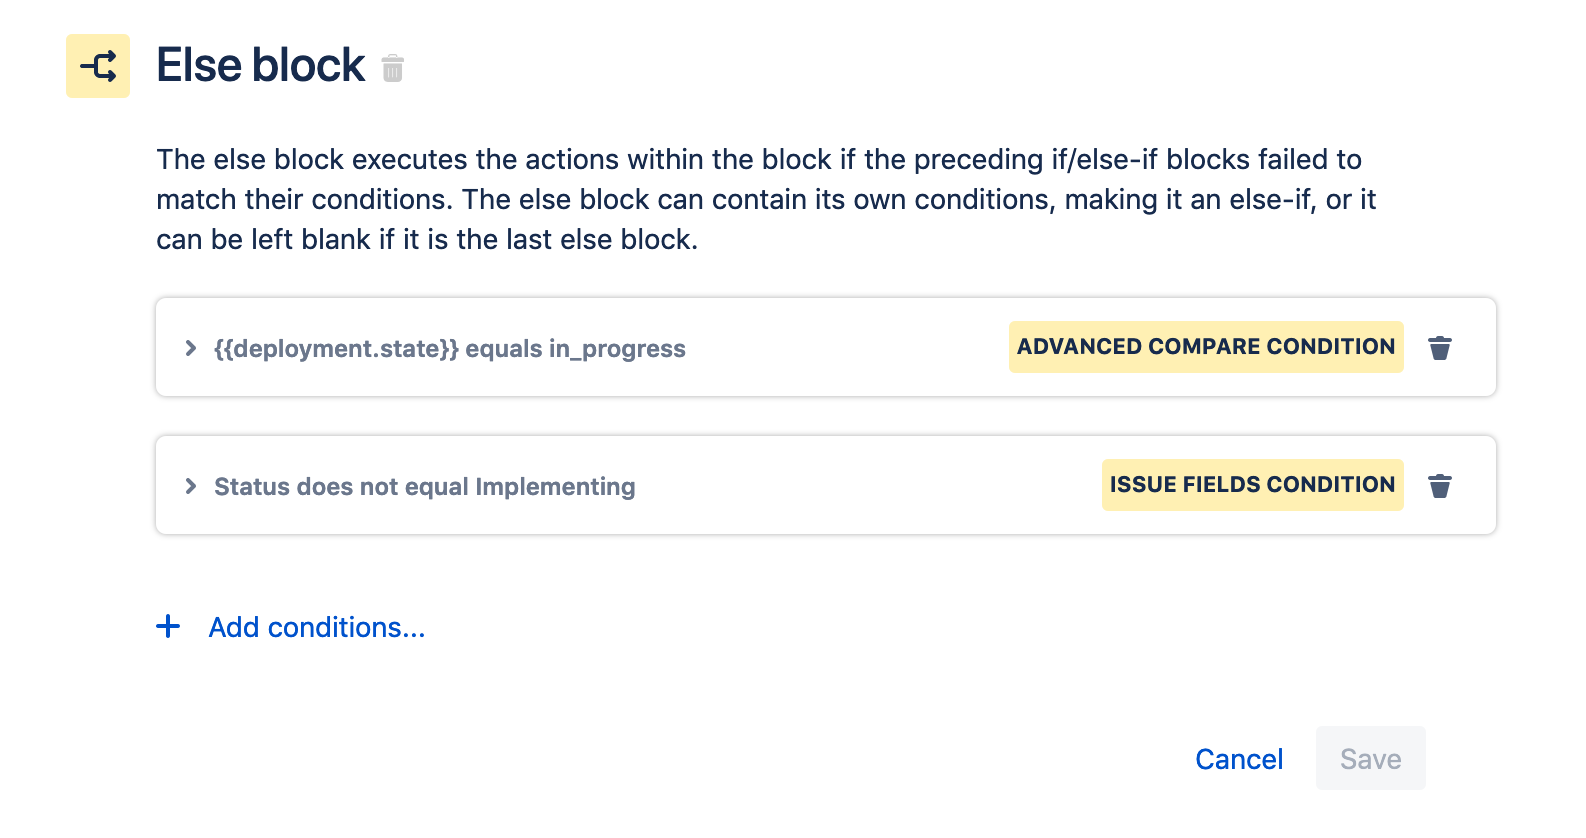
Edit the automation rule When a deployment is completed, failed or canceled → then transition request accordingly
Edit the Else-if block {{deployment.state}} equals in_progress.
Add an Issue Fields condition - Status does not equal Implementing
The final result should look like this:
Publish your changes.
Problem: When a change request is declined, the issue moves into the status Declined, but it continues to show under the queue Open Changes. This is because no Resolution was set when the issue was automatically transitioned.

Solution: Set a post function on the Authorize → Declined transition to set the resolution to Declined.
- Click on Project settings > Workflows. Find the workflow tied to the Change issue type and click on Edit.
Find the transition leading from Authorize->Declined. Click on that transition and click Post Functions on the box which pops up.
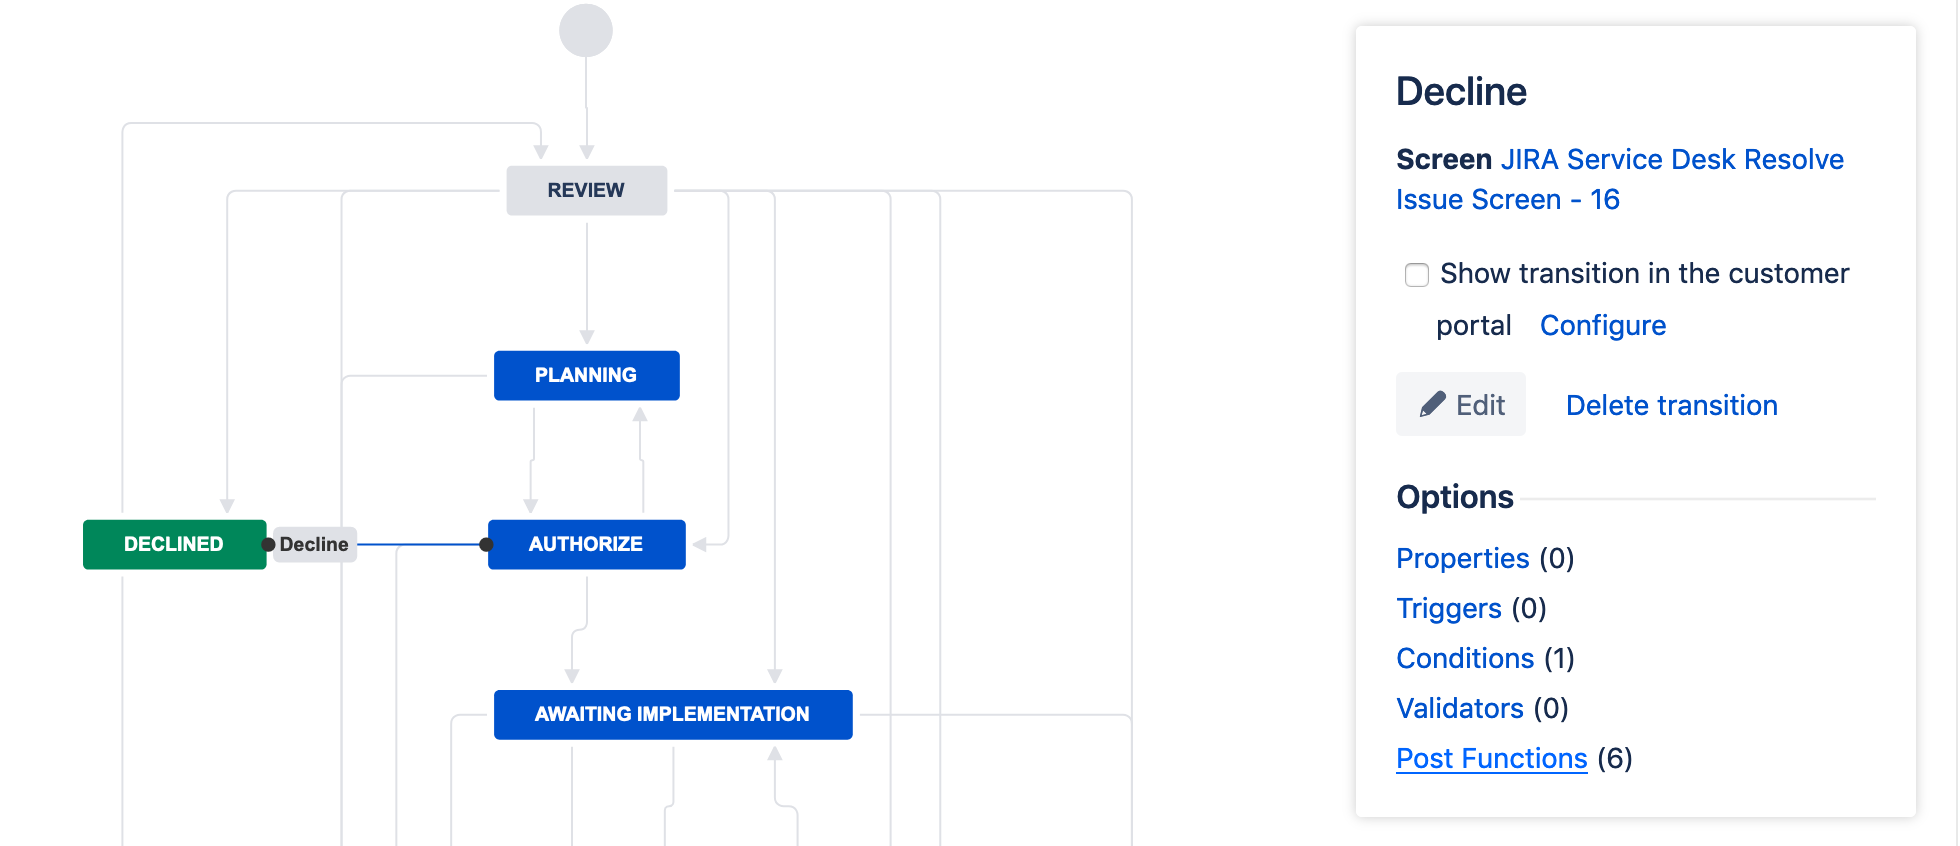
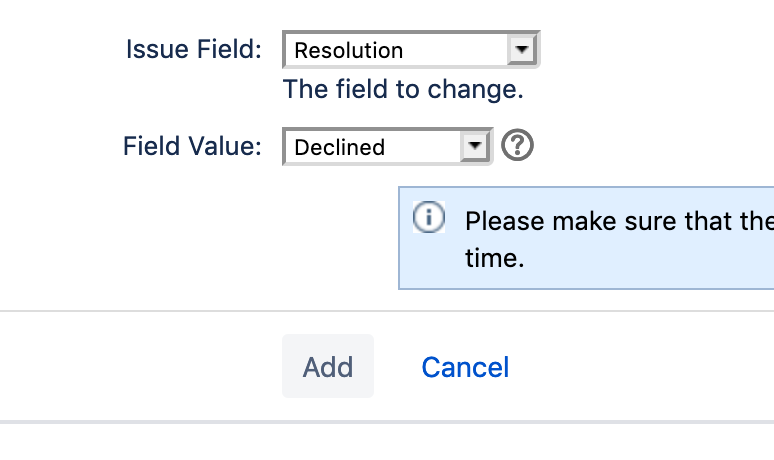
Click Add post function > Update Issue Field. Set the field to Resolution, the value to Declined, and then click Add.
- Click Publish Draft and you are good to go! Now change requests which are declined will be moved out of your Open Change queue.
Testing your Configurations
To confirm that it’s working, we can make a change directly within the Bitbucket repository. Let’s start with the repository connected to the Service which was marked as Tier 1.
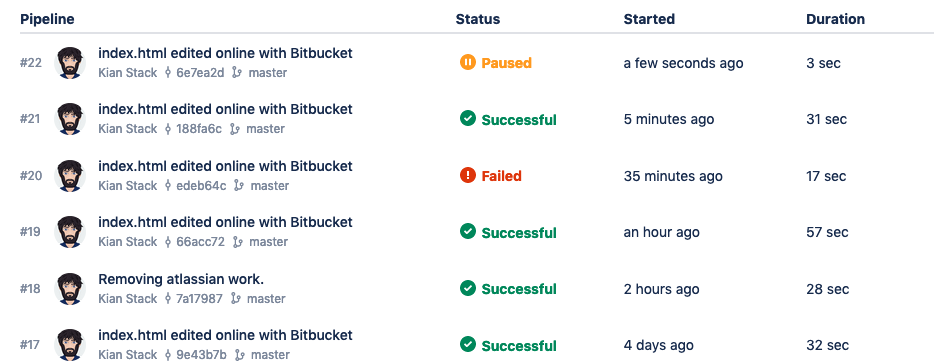
Go to the source for the repository and modify the index.html file. Then commit the change. This will kick off a new Bitbucket pipeline build which you can see by clicking on Pipelines on the left-hand toolbar.
If configured correctly, you should see the build was kicked off but has now been paused.
By clicking into the build, we can see that it’s waiting on a Change Request to be approved.
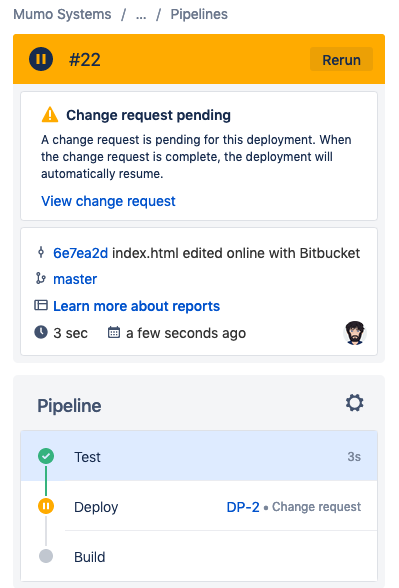
Click on View change request to see the connected change request. When we open the change, we should see that it is in the status Authorize. This is due to the out of the box automation rules which were set up to facilitate change management. You should also see that the Approvers field contains all people in the group which was set for the Change approvers portion of the Service.
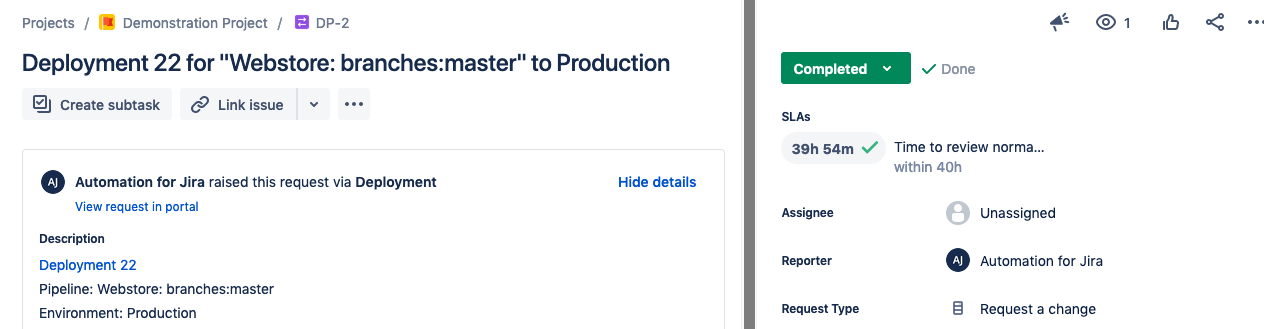
Navigate back to the change request ticket and approve the change. This will transition the issue to the status Awaiting Implementation. Whenever you are ready to finish the deployment, simply transition the ticket to Implementing. By clicking on the deployment link (located in the Description of the ticket), you should see the deployment is running again/completed.
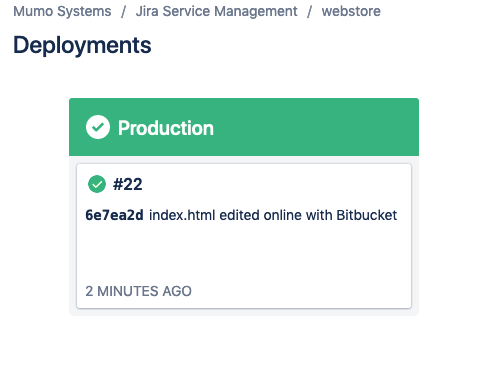
When finished, the ticket will automatically transition to Completed.
To see how a low-risk change works, try committing a change to the Webstore1 Service. If everything is set up correctly, it should automatically generate a change request. The Change Risk will be set to Low and the change will be automatically approved. The deployment will then be paused until an agent moves the change request from Awaiting Implementation-> Implementing.
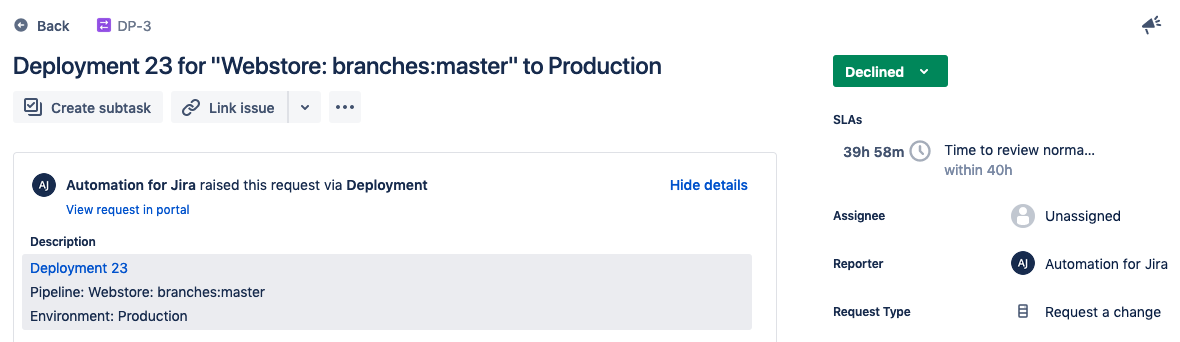
To see how the process works when a change is declined, commit a change to the Tier 1 Service repository, and then decline the change request that is generated. The deployment should fail and the ticket will no longer be visible in the queue.

Wrapping up
The enhancements that Jira Service Management introduce to the change module are really cool, and they were fun to learn how to set up. After spending so much time learning about these changes, I’m looking forward to helping clients implement these solutions for themselves!
To learn more about Jira Service Management or any other Atlassian products, contact Mumo Systems, and we’d be happy to talk with you about how Atlassian’s tools can meet your needs.
Recent posts
-
 AtlassianOct 25, 2024
 -
 AtlassianOct 21, 2024
 -
 AIAug 13, 2024