
Abacus
PRIORITIZE JIRA WITH RICE PRIORITIZATION FRAMEWORK
Dec 21, 2020
Having trouble prioritizing your Jira tasks? In this post, we'll explore use of the RICE prioritization framework for quickly quantifying the potential payout of project proposals. This framework can help you quickly identify which proposed initiatives will be the most valuable, and importantly, help your team decide what to work on first.
RICE Framework - Reach, Impact, Confidence, Effort

The RICE framework is a straightforward prioritization framework designed to help product managers quantify proposed projects, features and initiatives. A series of proposals with normalized RICE scores are easy to sort, and the scores help teams make data-driven decisions about how to focus their efforts.
Reach
Reach is an estimation of the number of users this project will reach over a given timeframe.
The units associated with reach are ultimately up to you, but consistency in units will help standardize your RICE scores, ultimately making them more valuable.
Examples:
- If your project leads to 150 new customers in the next quarter, your reach score is 150 customers/quarter
- If your project delivers 1,500 new prospective customers to your product in the next month and 30% make a purchase, then your reach score is 450 customers/month
Impact
Impact is an estimation of your projects overall result in achieving a goal.
This can be a quantitative goal (e.g. How many new conversions will this project result in?), or a more qualitative goal (e.g. How will this improve my brand recognition?)
It's often helpful to rely on a tiered scoring system in order to avoid over-analysis. The following table presents a good starting point.
- 3 - Massive Impact
- 2 - High Impact
- 1 - Medium Impact
- .5 - Low Impact
- .25 - Minimal Impact
Confidence
The confidence component of the RICE score assists in controlling for intuition/anecdotal data in the analysis process.
While assessing your confidence, take into account questions like:
- Have all the teams seen this idea? Do they agree with your effort estimations?
- Has this been tested in production?
- Have your users asked for this feature?
Your answers to these questions should help you determine how confident you are about the project's potential for success.
In the interest of avoiding over-analysis, try sticking to tiered values like the following:
- 100% = high confidence (I have the research, the customers have seen this, this is guaranteed to succeed)
- 80% = medium confidence (I am very confident about this, but engineering identified some cost concerns I hadn't considered)
- 50% = low confidence (I have a gut feeling this initiative will work, but I have done little-to-no research and I'm not certain how much value customers will place in it)
- 20% = moonshot (I have done no research, consulted no customers, nor conferred with any involved teams)
Effort
The effort component represents the cost of the project.
This is typically measured in person-months, or the number of months it would take a single person to complete this project. Consider every aspect of the project (i.e. design, engineering, development, QA) to help normalize your RICE scores across projects.
Calculate RICE Score with Abacus
(In order to follow along with this tutorial, you'll need to install Abacus into your Jira instance)
Your projects are already in Jira, so why not calculate RICE inside your Jira instance? This solution not only provides a central view into the future of your project, it also enables you to automate your Jira instance based on RICE scores.
Creating Custom Fields
Calculating RICE with Abacus requires 5 custom fields - one field for each of the RICE components and a fifth field for storing the result. If you need help creating these fields, consult the Atlassian documentation. As mentioned above, it's often helpful to constrain values for confidence and impact to a few tiered values. Abacus supports the use of Select List (Single Choice) custom fields, making constraining input values straightforward.
These images show the setup of the Select List (single choice) fields in our demo project.


Setting up a Formula
First we're going to a new Generic Numeric Formula using the RICE formula and our custom fields.
- In your project settings, navigate to the Abacus tab.
- Click 'Create Formula' under the Numeric Formulas header. Choose 'Generic' from the numeric formula options.
- Give the new formula a name.
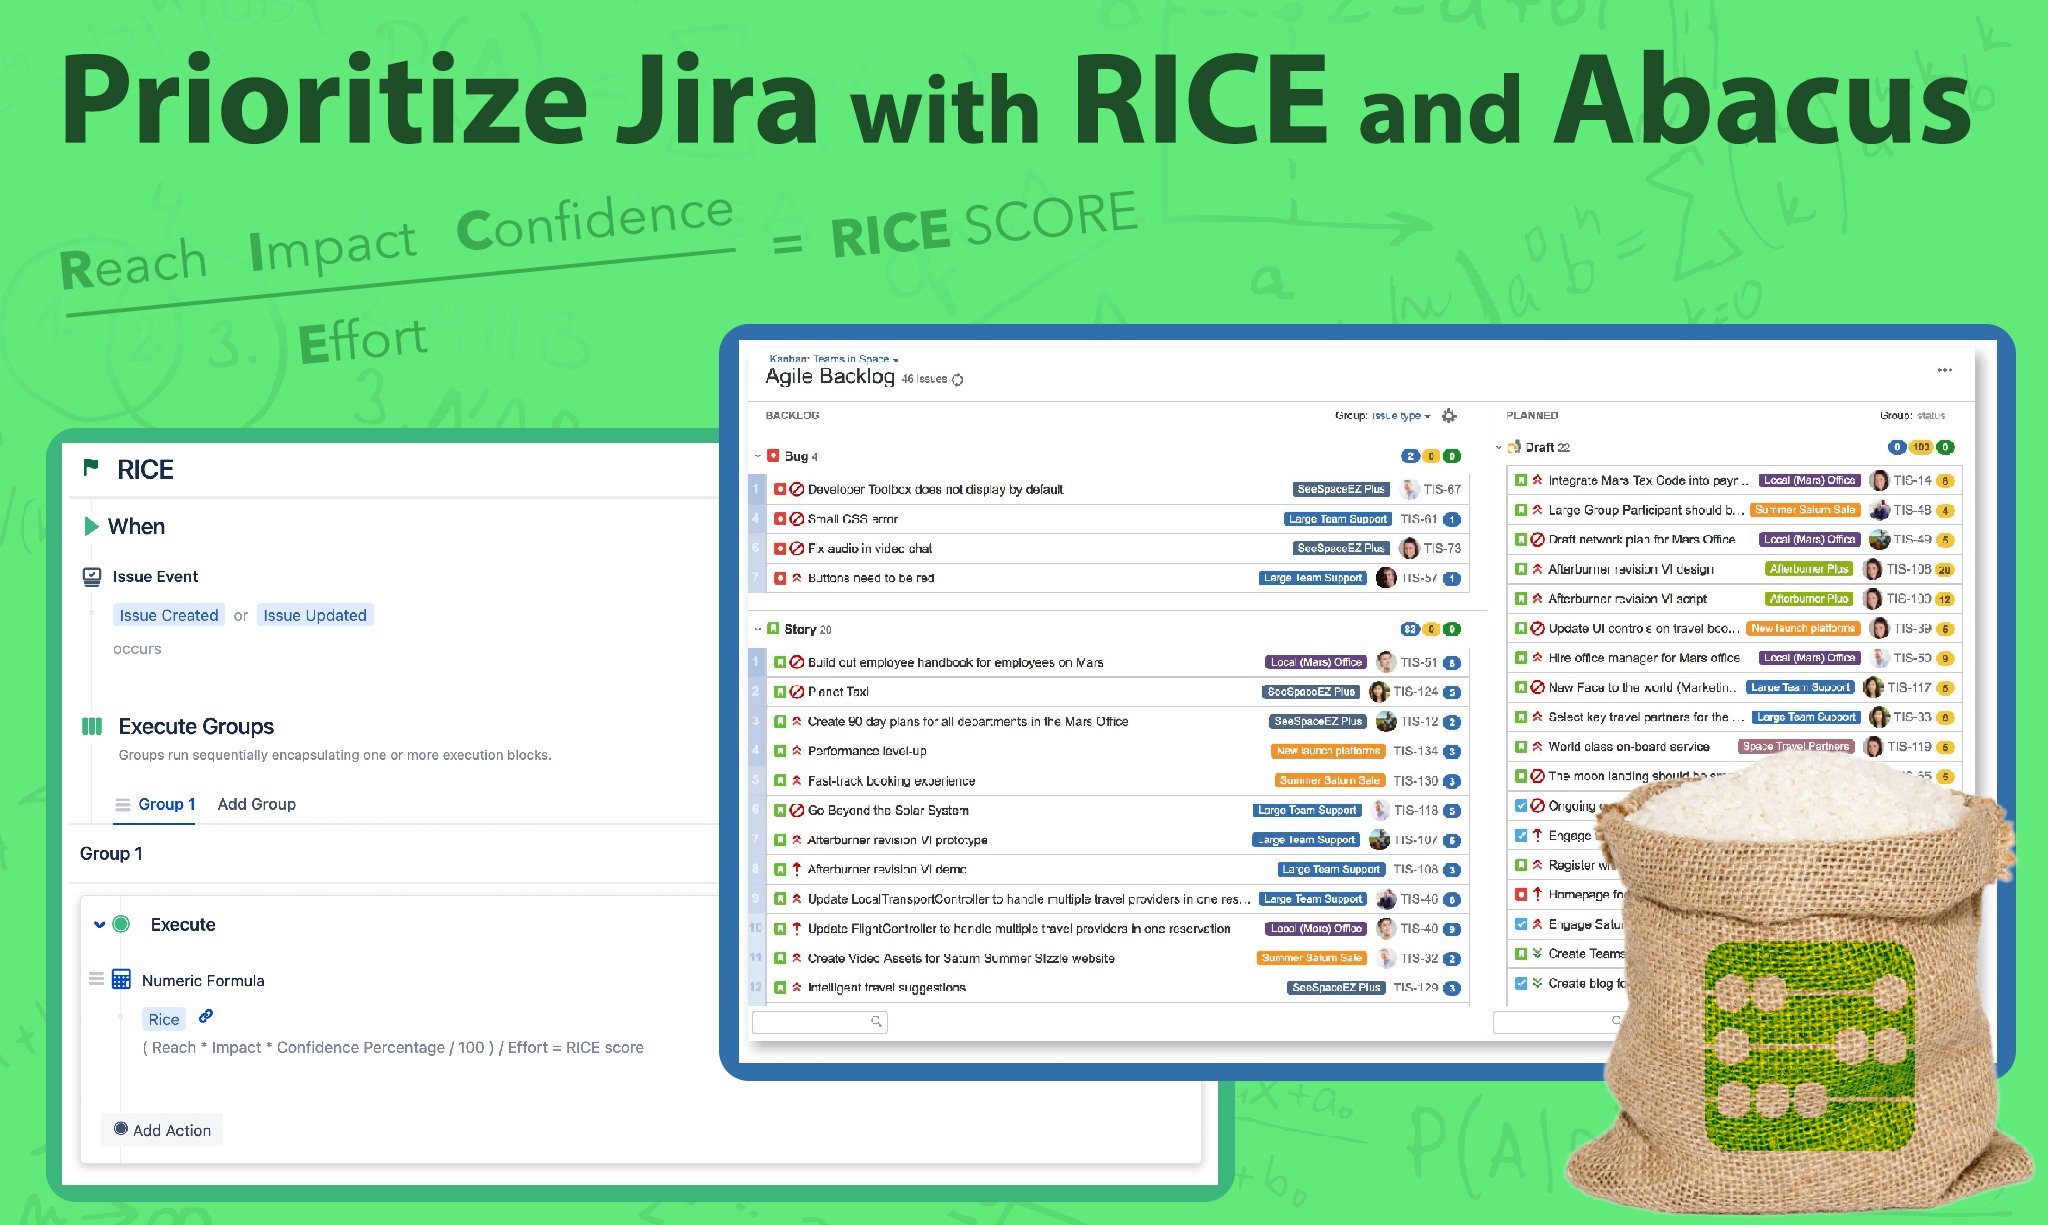
- In the formula text box, recreate the RICE formula using the custom fields you created. For each field, start by typing '@' and you'll see a dropdown of available fields as you type. eg. ( Reach * Impact * Confidence Percentage / 100 ) / Effort
- In the Result Field dropdown select the custom field you created to store the final result.
Your formula should look similar to this...

- Save your new RICE formula.
Setting up an Execution Plan
Next we'll create an Execution Plan to define how our new formula is triggered. An Execution Plan allows you to choose which events trigger an Abacus formula to run, and which issues those formulas run against.
- Beneath your formula, click 'Create new Execution Plan' or navigate to the Execution Plan tab and add an execution plan.
We want our formula to trigger any time there might be a new value in one of our R.I.C.E. fields.
- Leave the Trigger Type set to 'Issue Event' and add 'Issue Created' and 'Issue Updated' under Trigger Details. That way, the formula will run for values entered when the issue was created and update every time a field is changed.
- If your formula isn't already in the plan, click 'Add Action' and choose your RICE formula from the Numeric Formulas.
The final plan should look like this...

- Save your new execution plan.
Try it out!
Now that everything is set up, try creating a new issue. Fill out your R.I.C.E. fields and hit 'Create'. When you navigate to the new issue, you should see that your RICE score has been calculated into your results custom field.

Prioritize your Backlog
The next step is using this information to prioritize your work. You can do this in multiple ways, such as JQL filters and dashboard gadgets. If you're using Jira Software, you're probably using a backlog. We're going to show you how to update your backlog to prioritize higher RICE scores. Note that you'll be unable to re-rank your Backlog after making these changes.
- Navigate to your project's backlog, and select 'Board Settings' in the upper right hand corner.
- Click 'Edit Filter Query'.
Update the JQL to your own equivalent of...

- Click 'Search' to test your query, and then 'Save'.
Now your backlog should show issues ranked by their RICE score. You're ready to start building sprints!
Recent posts
-
 JSMMar 12, 2024
 -
 DevOpsMar 06, 2024
 -
 ITIM & AgileFeb 16, 2024